
Overload Hockey
How It Works
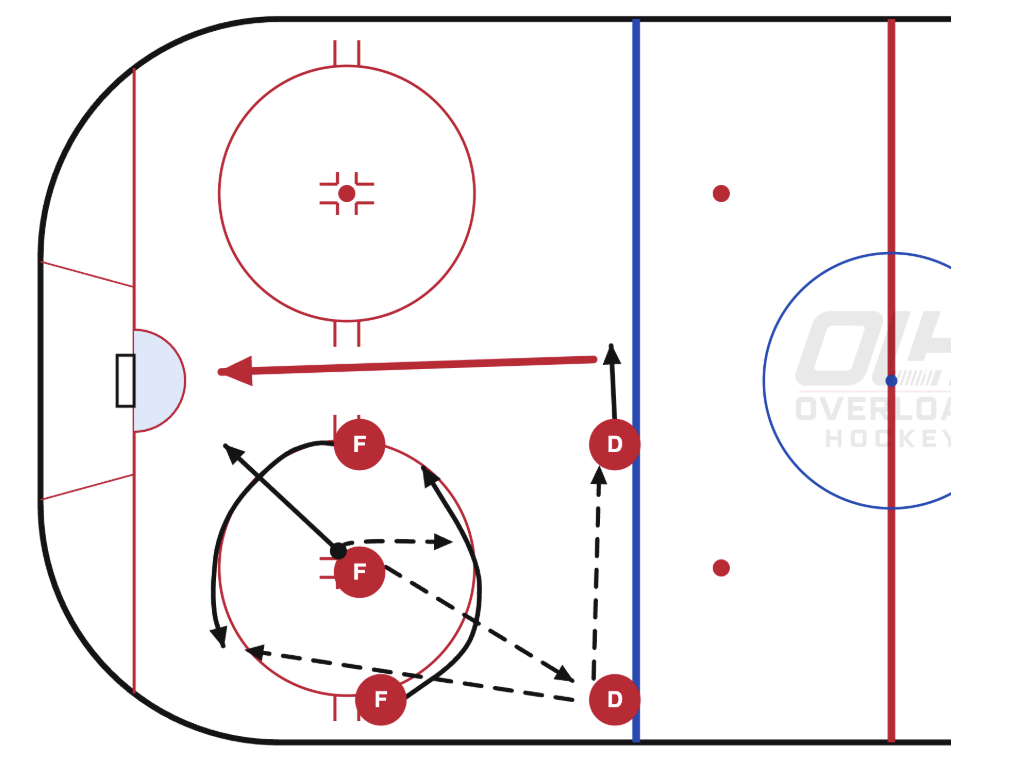
This over/under is an offensive-zone face-off play designed to create a point shot with traffic in front. The face-off is in the lower circle, and the two wingers cross on different routes rather than skating into the same space.
The Play
The center wins the draw back to the defenceman on the boards-side point, then drives toward the net to become a screen or rebound option.
The two wingers run the over/under. The winger starting low goes over, curling up around the outside of the circle toward the high slot. The winger starting high goes under, curling down around the inside/bottom of the circle. That crossing movement makes their defenders sort out who follows whom.
The puck moves across the blue line from the near defenceman to the far defenceman.
The far defenceman shoots through the traffic. The centre is at the net, while the wingers' crossing routes can pull coverage away and leave someone available for a tip or rebound.
Coaching Point
Win it cleanly back, have the forwards move immediately on the drop, and get the D-to-D pass and shot away before the defenders recover. If the draw isn't won cleanly, abandon the routes and compete for possession first.
Related
Draw this up for your team on the whiteboard, and pair it with the Hockey IQ guide so your players understand why the crossing routes work.
What to look for
- Centre wins the draw back to the boards-side point, then drives to the net
- Low winger goes over, curling outside toward the high slot
- High winger goes under, curling inside around the bottom of the circle
- D-to-D pass across the blue line, then the far defenceman shoots through traffic
- If the draw isn't won cleanly, abandon the routes and compete for possession
Coaching cues
- Win it cleanly back
- Forwards move immediately on the drop
- Wingers cross — never skate into the same space
- D-to-D, then shoot through the screen
- Centre to the net for the tip or rebound
- Lose the draw? Compete first, routes second
Common mistakes
- Wingers skating into the same space instead of crossing
- Forwards standing still on the drop and letting defenders read the play
- The near defenceman forcing a shot instead of moving it D-to-D
- Shooting before the screen and crossing routes develop
- Running the routes after a lost draw instead of competing for the puck
Related content
Breakout: Slash
Breakout: Slash
A simple breakout that creates three clear options: the wall, low support, and a weak-side slash through the middle.
Defensive Zone: Hybrid Coverage
Defensive Zone: Hybrid Coverage
Three defenders cover low while two forwards protect high; when the puck moves above the circles, all five switch to man-to-man.
Defensive Zone: Swarm & Blitz Pressure
Defensive Zone: Swarm & Blitz Pressure
A coordinated pressure trigger that outnumbers a vulnerable puck carrier, wins possession, and quickly turns defense into offense.