
Basic setup
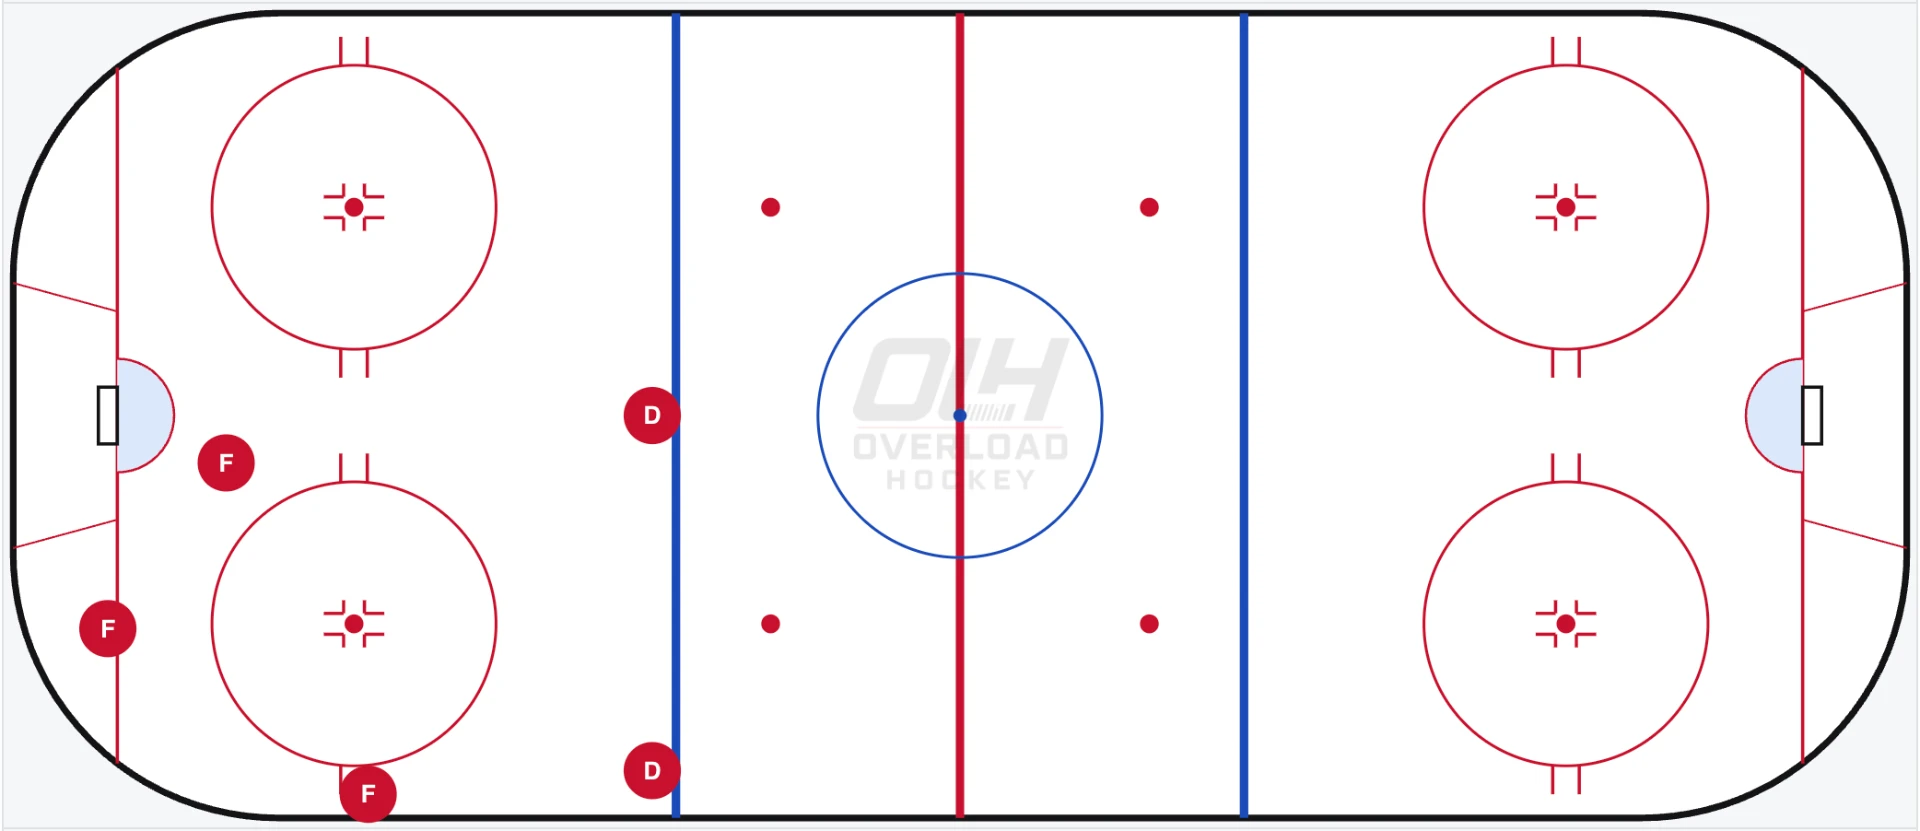
The five-skater starting shape before the penalty kill is moved out of position.
Option 1 — high-slot shot
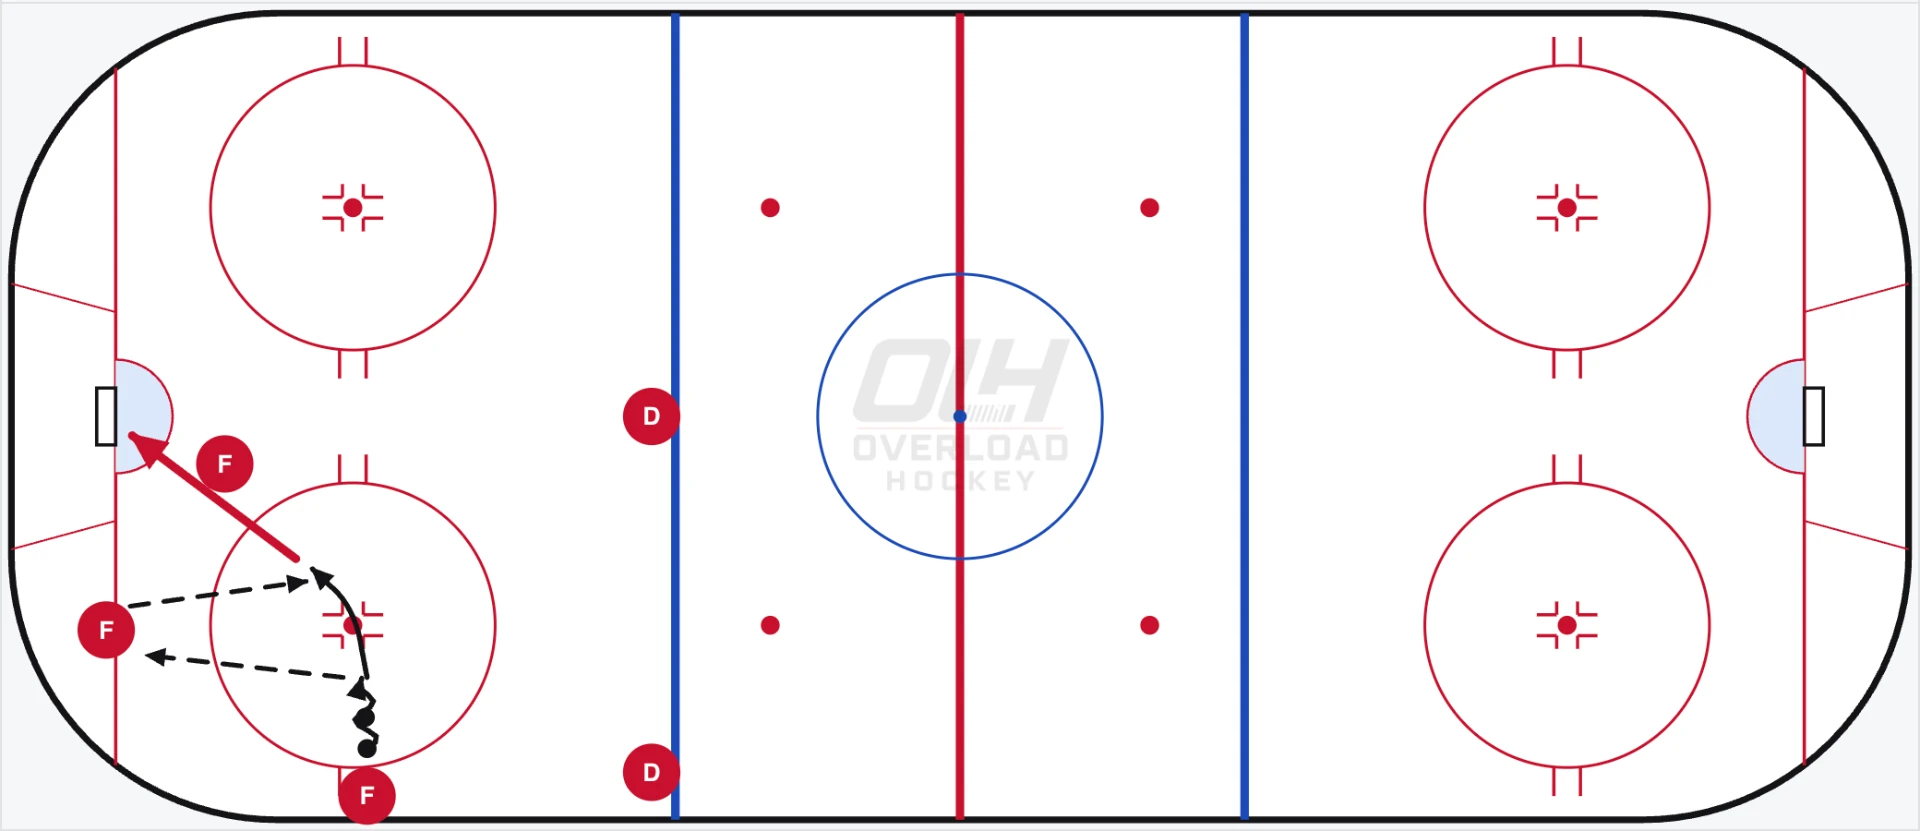
D1 draws the top penalty killer out before finding F1 through the opened seam.
Option 2 — give and go
F1 and F2 isolate one penalty killer, exchange the puck, and attack the net.
Option 3 — behind-the-net read
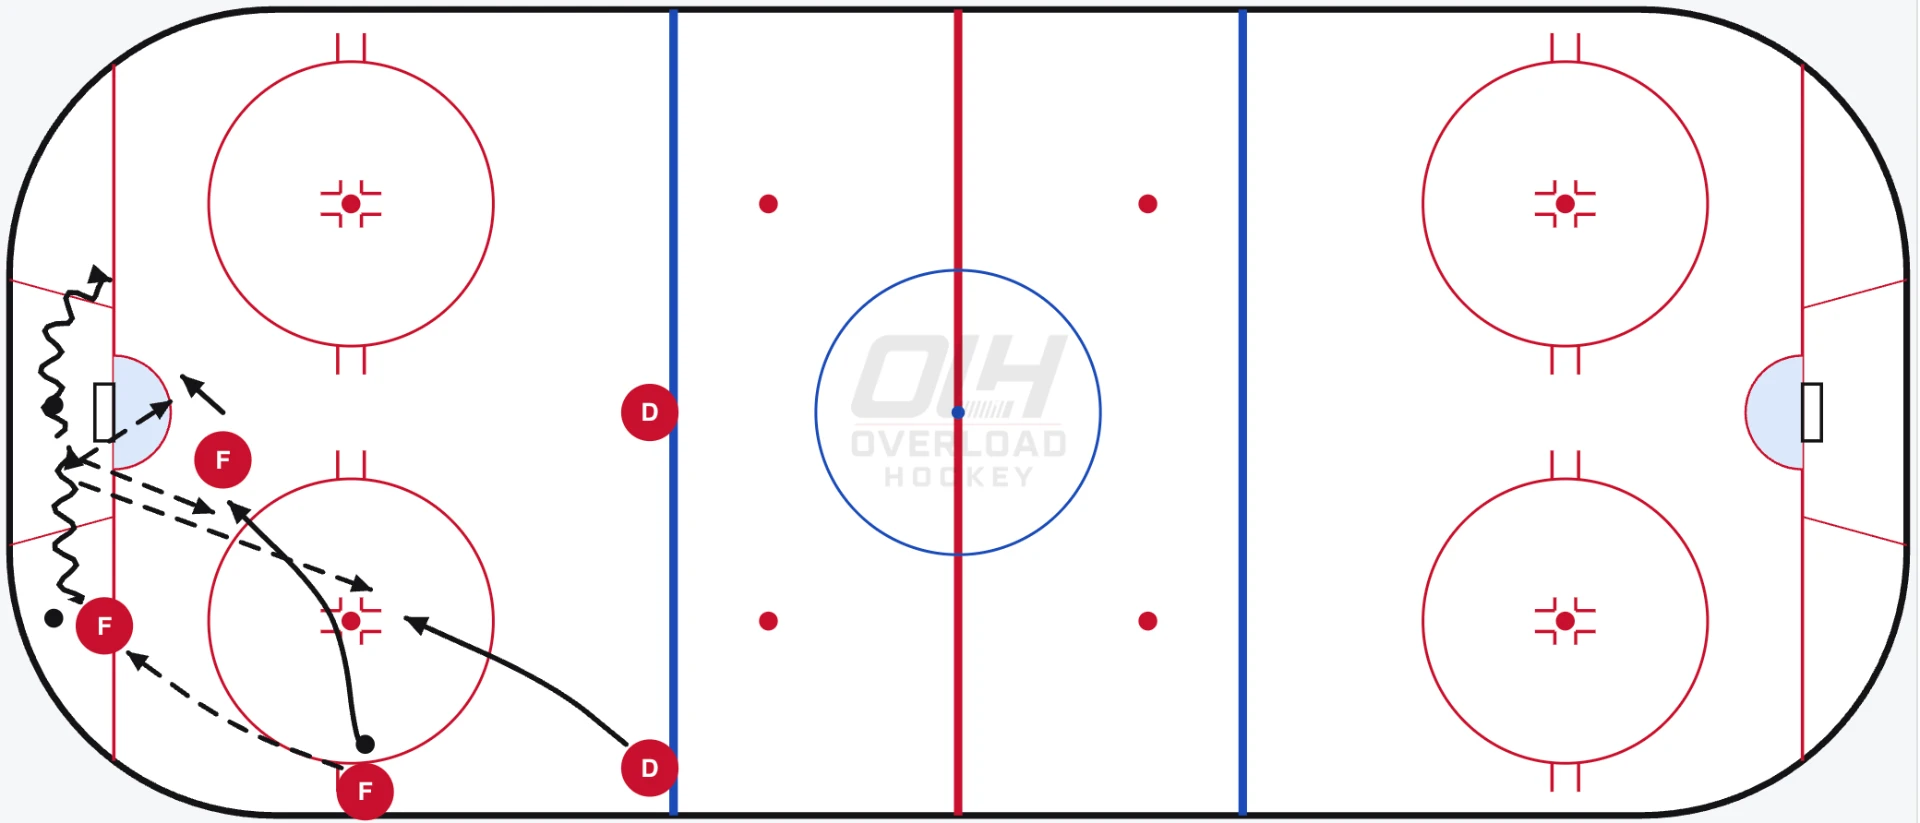
F2 takes the puck behind the net, opening either F1 or D1 in the slot.
The idea
The Overload is one of the more popular power-play systems because so many options can develop once it is set up. Four of our five skaters work on one half of the ice, creating short, supported passes and several ways to pull the penalty killers out of position. The system can be run from either side of the ice.
In the setup shown, F1 should be right-handed if possible and D1 should be left-handed if possible. When the power play runs from the opposite side, those handedness preferences reverse.
Playing the Overload
The Overload power play is designed to create a numerical advantage on one side of the ice. Three players work together around the half wall, goal line and net area, while the other two players provide options through the middle and at the point. The half-wall player is generally the quarterback and should be patient with the puck, using the point, goal-line player and middle option to move the penalty kill out of position.
The goal is not simply to pass the puck around the outside. We want to create a 3-on-2 around the puck and force the penalty killers to commit. Once they do, we attack the space they leave behind. Moving the puck below the goal line is particularly effective because it forces defenders to turn toward their own net and can open the slot, back door or net-front player.
When a shooting opportunity is created, we need traffic at the net and players arriving for rebounds. If nothing is available, keep possession, move the puck back high and start again rather than forcing a play through the penalty kill.
Draw the setup up for your team on the whiteboard, and see how penalty kills respond in the Diamond and Push Down systems.
Reading the diagrams
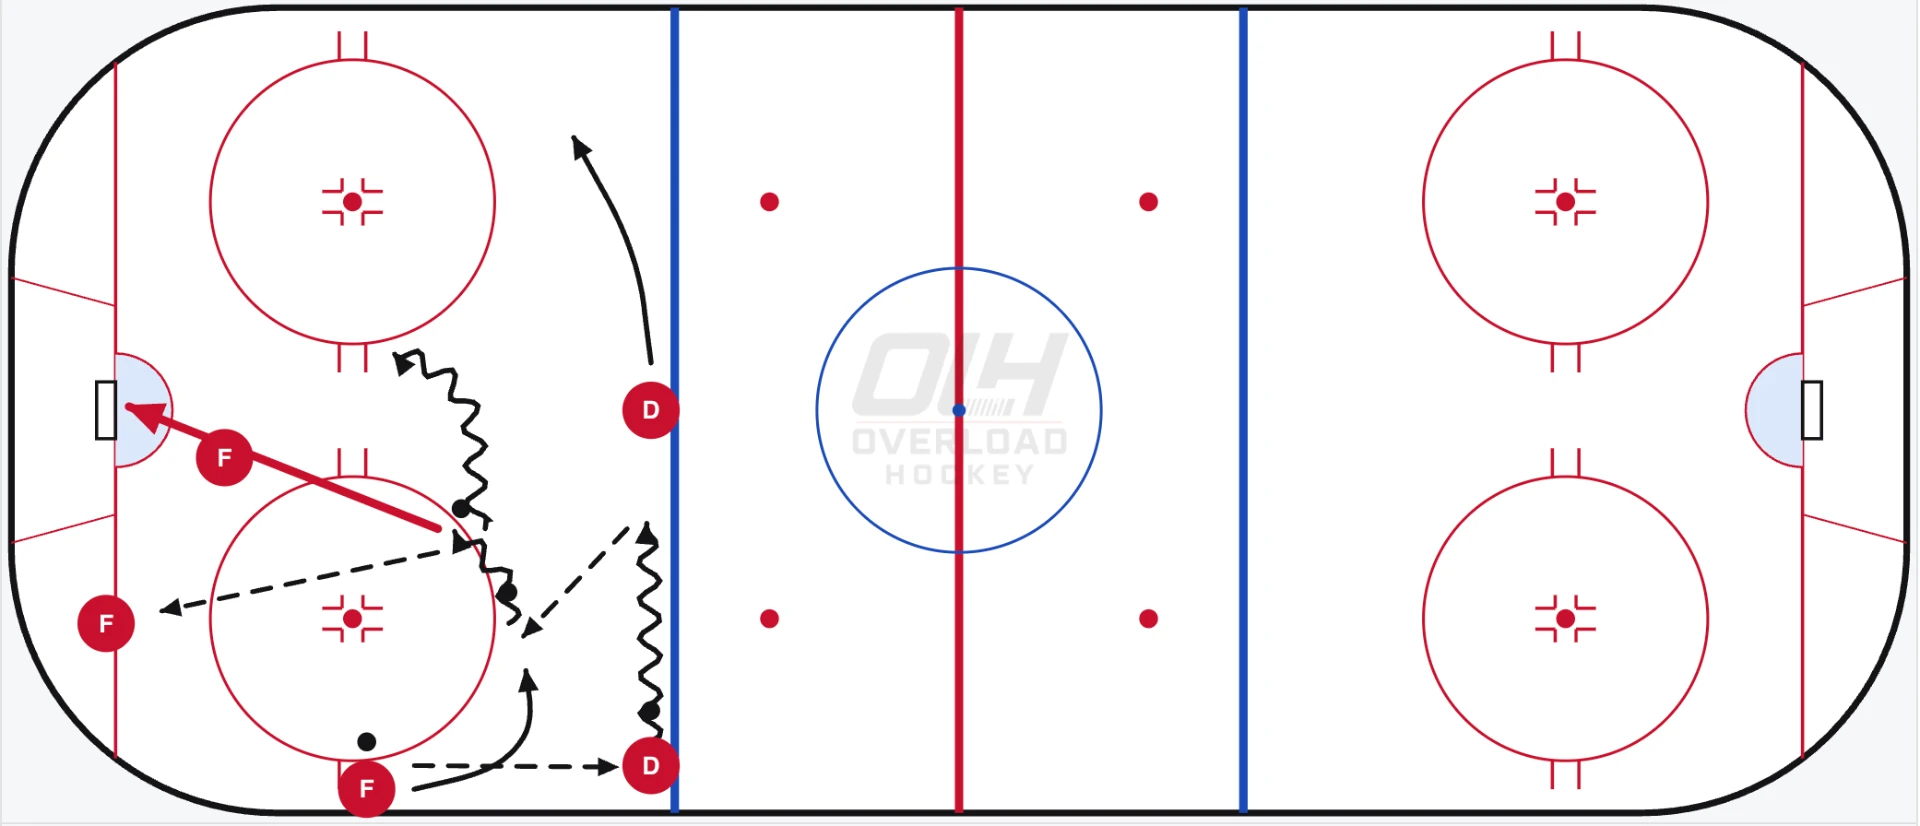
The net we are attacking is at the left. Red circles are our five power-play skaters, the black dot is the puck, solid arrows show movement or a shot, and dashed arrows show a pass.
The first diagram shows the basic setup. The next three diagrams show options that can develop from the same structure.
Option 1 — high-slot shot
The main idea is to get F1 into a strong shooting position in the high slot by drawing the top penalty killer out toward D1. Once D1 has pulled that penalty killer in, D1 passes to F1, who attacks the seam created by the out-of-position penalty killer. F2 and F3 must recognize the developing shot and create traffic and havoc in front of the net.
Option 2 — give and go
This option is commonly known as the give and go. F1 and F2 isolate X1 in a two-on-one situation. F1 gives the puck to F2, breaks to the net, and expects to receive it back in a strong scoring position. F3 can either block out X2 and create traffic in front or get open at the far post.
Option 3 — behind-the-net read
This option requires F2 and D1 to read how the penalty killers react when F2 takes the puck behind the net. If X1 takes away the pass to F1, D1 slips quietly into the space that X1 has vacated. X4 will often get caught watching the puck, giving D1 a chance to move into the slot undetected. If X1 does not take that option away, the pass to F1 should be available.
Why it works
The Overload forces penalty killers to defend several threats from the same starting shape. Short puck movement and coordinated off-puck timing can open the high slot, the net-front lane, or the weak-side space before the penalty-kill box can recover.
What to look for
- Use the basic setup to create several options without changing the overall structure
- Draw the top penalty killer toward D1 to open F1 in the high slot
- F1 and F2 can isolate one penalty killer with a give and go
- When F2 goes behind the net, read whether F1 or D1 becomes available in the slot
- F2 and F3 create traffic when the high-slot shot is coming
- Create a 3-on-2 around the puck and force the penalty killers to commit
- The half-wall player is the quarterback — patient with the puck
- Use the high (point) and low (goal-line) options to move the penalty kill
- Move the puck below the goal line to open the slot, back door or net front
Coaching cues
- Move the puck quickly enough to shift the penalty-kill box
- F1 and D1 use opposite handedness when possible for the side being run
- F1 gives the puck and immediately breaks to the net on the give and go
- D1 arrives quietly in the slot when X1 takes away F1
- Net-front players recognize the shot and create traffic
- Half wall controls the play
- Traffic on every shot, with players arriving for rebounds
- Nothing available? Keep possession, go back high and start again
Common mistakes
- Holding the puck long enough for the penalty killers to recover
- F1 staying outside the high-slot seam after D1 draws pressure
- F1 giving the puck without continuing to the net
- F3 watching the play instead of screening or finding the far post
- D1 moving into the slot before the behind-the-net action creates space
- Passing around the outside without ever attacking the space created
- Forcing a play through the penalty kill instead of resetting high
Related content
Breakout: Slash
Breakout: Slash
A simple breakout that creates three clear options: the wall, low support, and a weak-side slash through the middle.
Defensive Zone: Hybrid Coverage
Defensive Zone: Hybrid Coverage
Three defenders cover low while two forwards protect high; when the puck moves above the circles, all five switch to man-to-man.
Defensive Zone: Swarm & Blitz Pressure
Defensive Zone: Swarm & Blitz Pressure
A coordinated pressure trigger that outnumbers a vulnerable puck carrier, wins possession, and quickly turns defense into offense.