
The 1-2-2 forecheck is a structured forecheck designed to pressure the puck while taking away the opponent's easiest breakout options. Rather than sending multiple players deep to chase the puck, the 1-2-2 uses one primary forechecker with two layers of support behind them.
The goal is to influence where the breakout goes, close the available passing lanes, and force the puck carrier into a predictable decision. When all five players stay connected, the forecheck can create turnovers while still maintaining good defensive structure if the opponent breaks the initial pressure.
The 1-2-2 can be played more aggressively or conservatively depending on where F1 applies pressure and how tightly F2, F3, and the defensemen close space.
Reading the Diagram
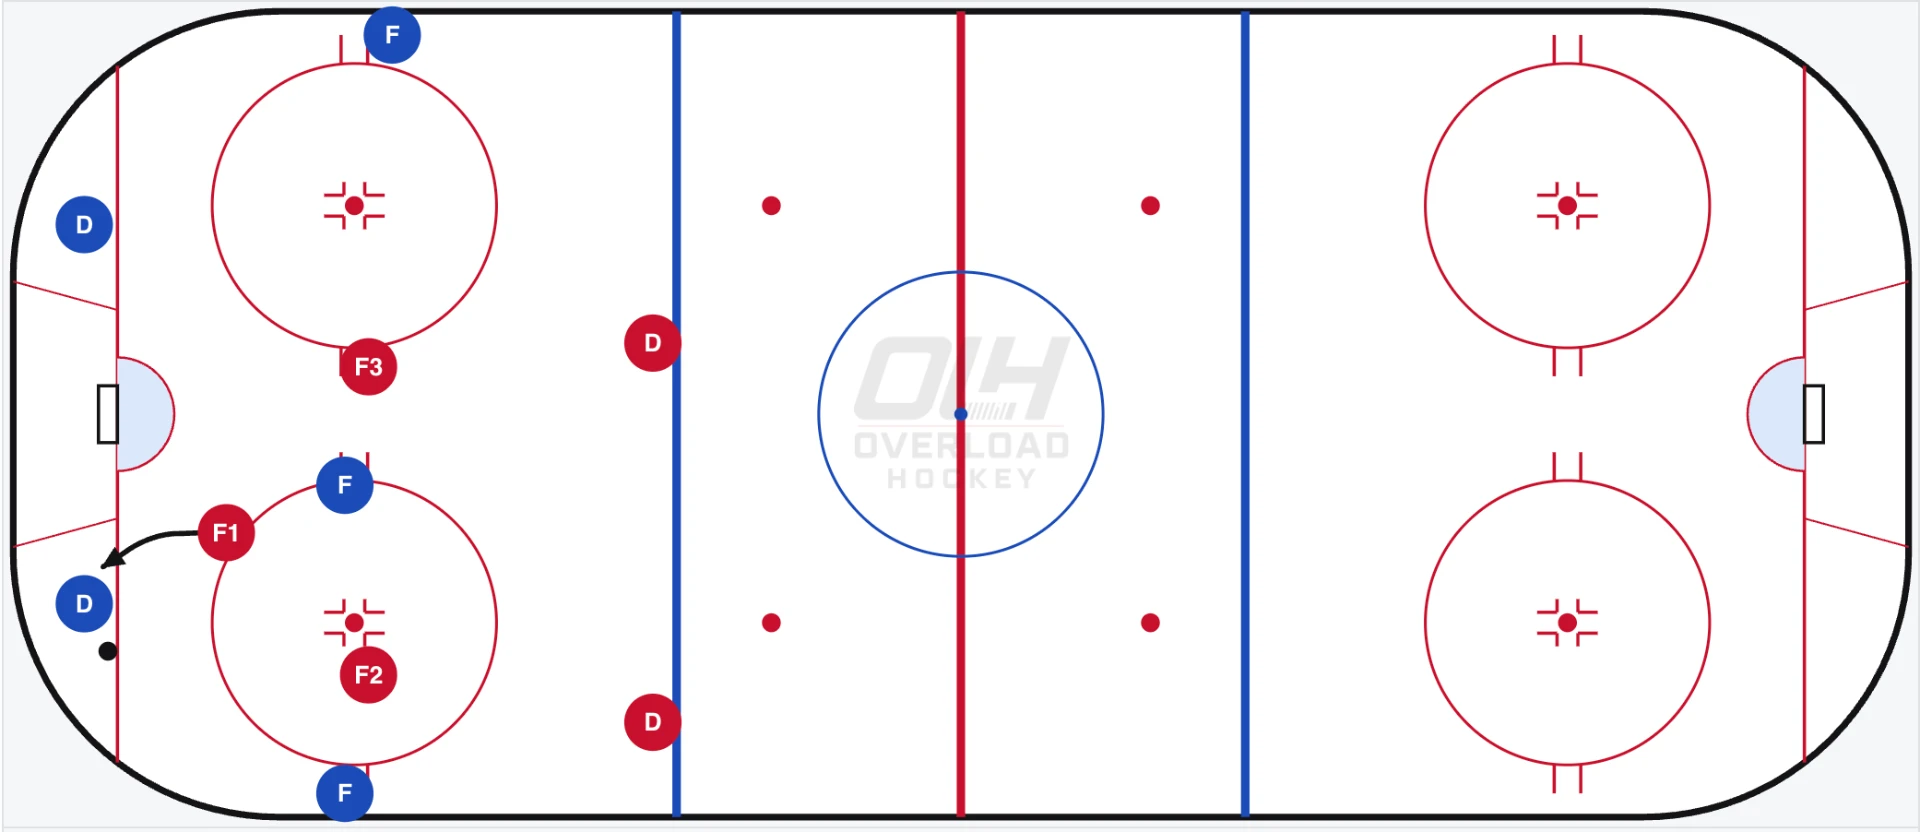
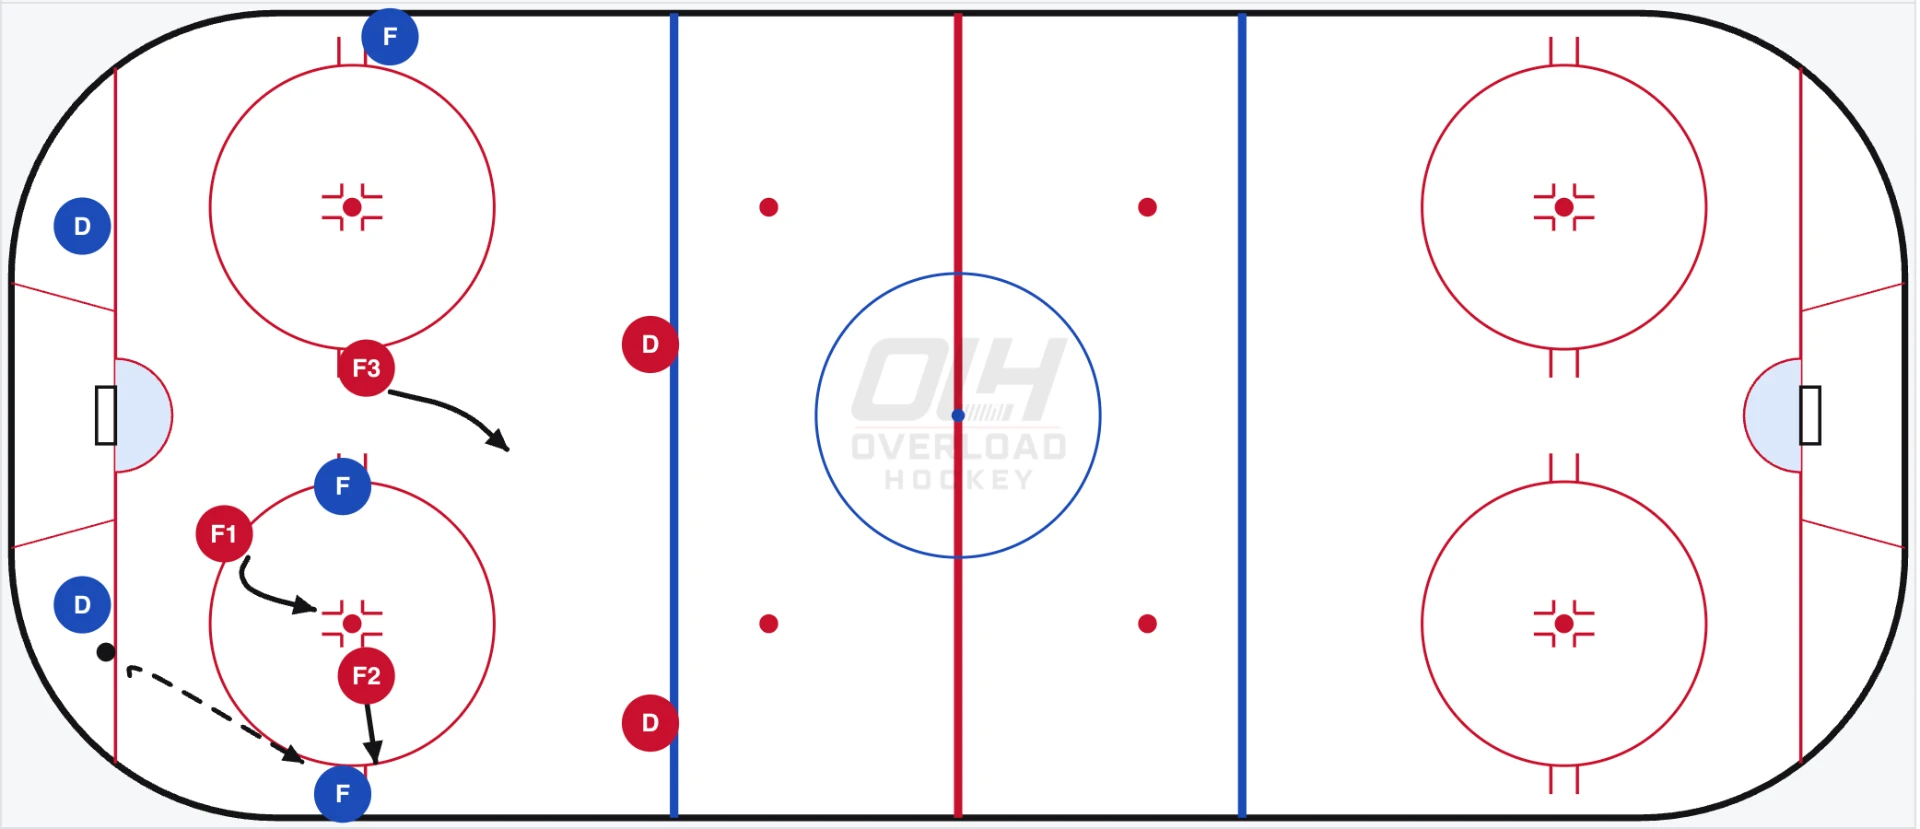
In this example, our team is attacking the net on the left side of the rink.
Red markers = our forechecking team
Blue markers = the opponent breaking the puck out
Black dot = puck
The structure creates three layers:
F1 → F2/F3 → D1/D2
Each layer has a different responsibility.
F1 — Apply Pressure and Establish the Direction
F1 is the first forechecker and initiates the entire structure.
Rather than skating directly at the puck carrier, F1 should take an angle that removes one option and encourages the puck carrier toward the area where the rest of the forecheck is positioned to react.
F1's job isn't necessarily to win the puck immediately.
The first objective is to make the breakout predictable.
If F1 can force a rushed pass, eliminate a D-to-D option, or push the puck toward one side of the ice, the players behind F1 can anticipate the next play and close space.
F2 — Strong-Side Pressure
F2 reads the direction created by F1 and becomes the next layer of pressure.
When the puck is moved toward F2's side, F2 closes on the receiving player while maintaining a good angle and taking away the easiest route up the wall.
F2 should not leave early and chase below the puck unnecessarily. Their timing is important. Once the pass is committed, F2 can close quickly and attempt to create the turnover.
F3 — Protect the Middle
F3 provides balance on the opposite side of the forecheck.
While F2 pressures the strong side, F3 stays above the puck, protects the middle of the ice, and reads the opponent's next option.
F3 must resist the temptation to chase the puck across the zone.
If F3 gets pulled too far toward the strong side, the opponent may be able to reverse the puck or attack through the middle with speed.
D1 and D2 — Control the Gap
The defensemen form the final layer of the 1-2-2.
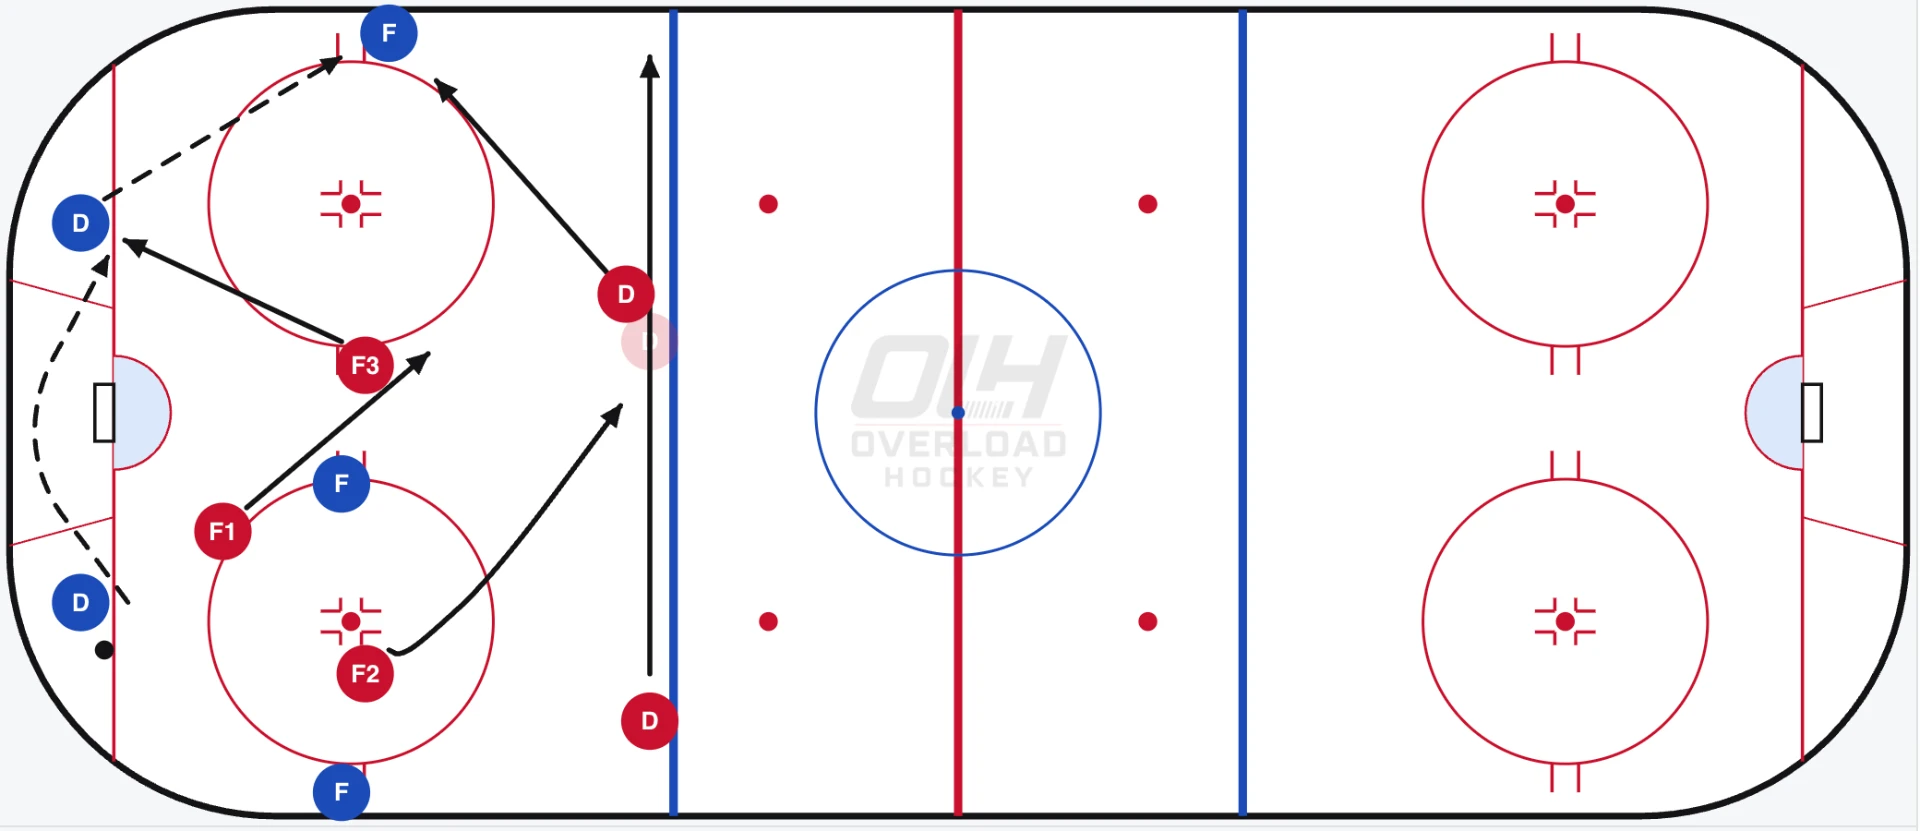
Their job is to maintain a tight enough gap to support the forwards and prevent the opponent from easily gaining speed through the neutral zone.
When the forecheck creates a predictable outlet, the appropriate defenseman can step up and challenge the receiving forward while their partner provides support.
The defensemen shouldn't automatically pinch or blindly hold the blue line. Their positioning depends on puck pressure, possession, support, and the opponent's speed.
How the 1-2-2 Works
Everything starts with F1.
F1 takes an angle and attempts to dictate which direction the opponent moves the puck.
Once the breakout commits to a side, the rest of the forecheck shifts together.
The strong-side forward closes on the outlet. The weak-side forward protects the middle and remains available to react to a reversal or secondary pass. The defensemen move with the play and maintain tight gaps behind the forwards.
If the puck is reversed, the structure adjusts.
Players should rotate and recover into the structure rather than having multiple players chase the puck.
This is what makes the 1-2-2 effective: the opponent may have possession, but the forechecking team is trying to control where that possession can go.
Why It Works
The strength of the 1-2-2 is its ability to combine pressure with structure.
F1 forces the first decision.
F2 and F3 take away the next layer of options.
D1 and D2 control the space behind them.
When those layers stay connected, the breakout begins to run out of easy options. That can force the opponent into:
- A rushed pass up the wall
- A contested outlet
- A turnover
- A chip into traffic
- A dump through the neutral zone
- A pass back toward pressure
The forecheck becomes much less effective when those layers separate.
What to Look For
- F1 establishes the direction. Don't simply chase the puck carrier—use an angle to influence where the puck goes.
- F2 recognizes the strong side. Once the breakout commits, close quickly and take away the easy outlet.
- F3 protects the middle. Stay above the puck and don't get dragged into the same pressure as F1 and F2.
- The defense maintains a tight gap. Move with the forwards rather than automatically retreating toward your own zone.
- All five players shift together. The structure should move as one connected unit when the puck changes sides.
- Pressure determines aggression. Defensemen can be more aggressive when the puck carrier is under pressure and support is in place.
Coaching Cues
- F1: Take away one side and make the puck carrier predictable.
- F2: Read F1's angle. When the puck comes to your side, close quickly and under control.
- F3: Stay above the puck, protect the middle, and be ready for the next play.
- Defense: Maintain your gap, keep your feet moving, and step when pressure and support allow it.
- Everyone: Move together. If the puck changes sides, the entire structure must adjust.
Common Mistakes
- F1 chases instead of angles. Skating directly at the puck carrier can leave multiple breakout options available. F1 should use their route to eliminate an option and influence the play.
- F2 commits before the pass is made. Leaving too early can create an easy pass behind the pressure.
- F3 gets pulled toward the puck. If F3 joins the same chase as F1 and F2, the middle or weak side can become exposed.
- Two forwards pressure the same player. This wastes the structure and leaves another opponent open.
- The defense backs off too quickly. Giving up the blue line without a reason creates too much space between the forwards and defense.
- A defenseman steps without support. Aggressive gaps are valuable only when the puck is under pressure and another player can provide support.
- The five players become disconnected. Large gaps between F1, F2/F3, and the defense give the opponent room to play through the forecheck.
The Key
The 1-2-2 is not about having one player chase while four players wait.
It's about creating layers of pressure.
F1 influences the first decision. F2 and F3 take away the next options. D1 and D2 control the space behind them.
When all five players read the puck and move together, the opponent's breakout becomes increasingly predictable—and that's when the 1-2-2 can turn controlled pressure into turnovers and offensive-zone possession.
What to look for
- F1 establishes the direction. Don't simply chase the puck carrier—use an angle to influence where the puck goes.
- F2 recognizes the strong side. Once the breakout commits, close quickly and take away the easy outlet.
- F3 protects the middle. Stay above the puck and don't get dragged into the same pressure as F1 and F2.
- The defense maintains a tight gap. Move with the forwards rather than automatically retreating toward your own zone.
- All five players shift together. The structure should move as one connected unit when the puck changes sides.
- Pressure determines aggression. Defensemen can be more aggressive when the puck carrier is under pressure and support is in place.
Coaching cues
- F1: Take away one side and make the puck carrier predictable.
- F2: Read F1's angle. When the puck comes to your side, close quickly and under control.
- F3: Stay above the puck, protect the middle, and be ready for the next play.
- Defense: Maintain your gap, keep your feet moving, and step when pressure and support allow it.
- Everyone: Move together. If the puck changes sides, the entire structure must adjust.
Common mistakes
- F1 chases instead of angles. Skating directly at the puck carrier can leave multiple breakout options available. F1 should use their route to eliminate an option and influence the play.
- F2 commits before the pass is made. Leaving too early can create an easy pass behind the pressure.
- F3 gets pulled toward the puck. If F3 joins the same chase as F1 and F2, the middle or weak side can become exposed.
- Two forwards pressure the same player. This wastes the structure and leaves another opponent open.
- The defense backs off too quickly. Giving up the blue line without a reason creates too much space between the forwards and defense.
- A defenseman steps without support. Aggressive gaps are valuable only when the puck is under pressure and another player can provide support.
- The five players become disconnected. Large gaps between F1, F2/F3, and the defense give the opponent room to play through the forecheck.
Related content
Breakout: Slash
Breakout: Slash
A simple breakout that creates three clear options: the wall, low support, and a weak-side slash through the middle.
Defensive Zone: Hybrid Coverage
Defensive Zone: Hybrid Coverage
Three defenders cover low while two forwards protect high; when the puck moves above the circles, all five switch to man-to-man.
Defensive Zone: Swarm & Blitz Pressure
Defensive Zone: Swarm & Blitz Pressure
A coordinated pressure trigger that outnumbers a vulnerable puck carrier, wins possession, and quickly turns defense into offense.