
Overload Hockey
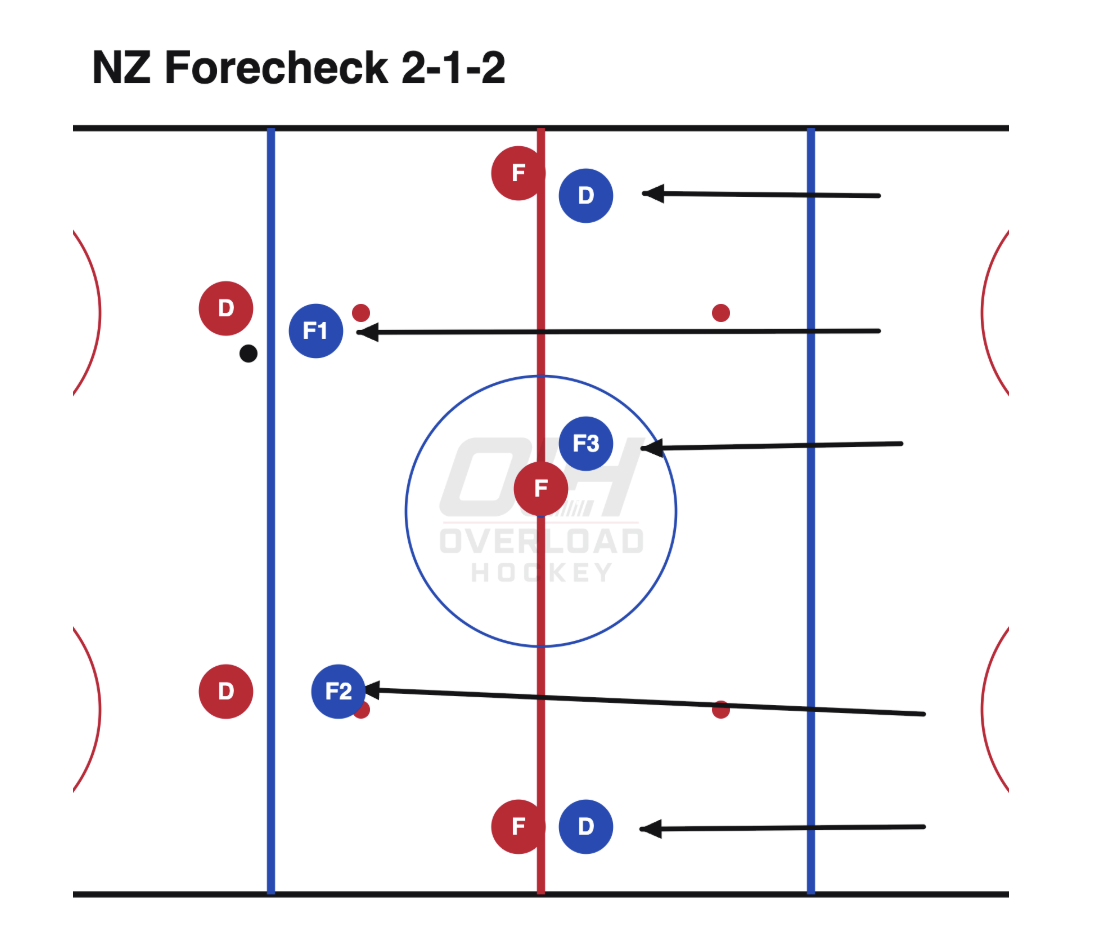
The 2-1-2 is an aggressive neutral-zone forecheck designed to pressure both sides of the ice while protecting the middle.
Instead of steering the opponent to only one side, our first two forwards are positioned across the neutral zone and can pressure either side.
Behind them, F3 protects the middle of the ice.
Our two defensemen stay behind the forecheck, maintain a good gap, and are ready to defend the blue line.
The basic structure is:
F1 + F2 = Pressure both sides
F3 = Protect the middle
D1 + D2 = Gap behind the forecheck
F1 and F2 — First Layer
F1 and F2 form our first line of pressure.
Position yourselves across the neutral zone.
You are responsible for taking away easy entries along your side of the ice.
When the puck comes toward your side:
Pressure it.
Angle the puck carrier toward the boards and make it difficult for them to attack the middle.
The opposite forward does not chase across the ice.
Stay on your side and protect against a pass or change of direction.
Puck on your side = pressure.
Puck away from you = hold your lane.
F3 — Protect the Middle
F3 sits behind F1 and F2 in the middle of the ice.
This is the most important position in the structure.
Do not get pulled toward the boards just because F1 or F2 is applying pressure.
Protect the middle.
Read where the puck is going and take away the opponent's next option.
If the puck carrier tries to cut toward the middle, you are there.
If they make a lateral pass, adjust with the play.
If F1 or F2 gets beaten, you become the next layer of pressure.
F3 = middle first.
D1 and D2 — Hold the Gap
The defensemen form the final layer.
Stay connected to the forwards.
Do not back off unnecessarily and create a huge gap through the neutral zone.
As our forwards pressure, move up with them.
Your job is to:
Maintain a tight gap
Protect our blue line
Read chips behind the forwards
Retrieve dump-ins
Step up when the puck carrier has limited options
The tighter our five players stay together, the less space the opponent has to attack.
When the Puck Goes to One Side
If the puck moves to the right side:
The right-side forward pressures.
F3 shifts toward the puck while still protecting the middle.
The left-side forward stays connected on the weak side.
The defense shifts behind the play.
We want to create layers.
Pressure outside.
Support inside.
Defense behind.
The puck carrier should feel like the available ice is disappearing.
Force Them Outside
Our priority is the middle.
We do not want opposing forwards attacking our blue line with speed through the center of the ice.
F1 and F2 use their positioning and sticks to discourage inside entries.
F3 protects the middle behind them.
We are trying to funnel the attack toward the boards.
Outside is okay. Middle is not.
If They Pass Across the Ice
Do not chase the pass.
The responsibility changes.
If the puck moves from F1's side to F2's side:
F2 pressures.
F1 recovers into their lane.
F3 shifts underneath.
D1 and D2 shift behind them.
The structure moves with the puck.
This is why both forwards must stay disciplined.
If F1 chases the puck across the entire neutral zone, we lose the 2-1-2 shape.
If They Try to Attack the Middle
Collapse.
F3 is our first protection through the center.
F1 and F2 close from the sides.
Our defense maintains a tight gap behind them.
We want to surround the puck carrier and remove their space.
Do not allow a player to skate freely between our forwards.
Nothing clean through the middle.
If They Chip or Dump the Puck
That's okay.
If our pressure forces the opponent to give up possession and put the puck behind our defense, the forecheck has done its job.
Our defense turns and retrieves.
F3 supports underneath.
F1 and F2 recover and get into breakout positions.
We would rather make their forwards chase a puck than allow them to enter our zone with possession and speed.
Make them earn the zone.
If the First Layer Gets Beat
F3 becomes the next layer.
Do not panic.
F1 and F2 recover hard through the middle.
Our defense establishes their gap.
We still have players between the puck and our net.
The strength of the system is its layers.
First layer: F1/F2.
Second layer: F3.
Third layer: D1/D2.
Stay Connected
The 2-1-2 only works if all five players move together.
If the forwards are aggressive but the defense backs away, we create a huge pocket of open ice.
If the defense steps up but the forwards don't pressure, we expose our defensemen.
Keep the distance between each layer tight.
Five players. Three layers. One unit.
When We Create a Turnover
Transition immediately.
The closest player wins the puck.
F3 becomes an immediate support option.
The opposite forward attacks open ice.
Our defense supports underneath.
Once we have possession, the neutral-zone forecheck is finished.
Turn defense into offense.
Coaching Cues
F1 + F2 = PRESSURE BOTH SIDES.
F3 = MIDDLE.
D = GAP UP.
Puck on your side = GO.
Puck away = HOLD.
Force outside.
Don't chase across.
Protect the middle.
Stay connected.
Make them dump it.
Turnover = GO.
The identity of our neutral-zone 2-1-2 is simple:
PRESSURE — MIDDLE — GAP.
F1 and F2 take away the D-to-D. F3 takes away the middle. The defense closes the space behind them.
We want to take away controlled entries, force the opponent outside, and make them put the puck somewhere we can get it back.
What to look for
- F1 and F2 pressure their own sides without chasing across the neutral zone.
- F3 protects the middle and becomes the next pressure layer if the first line is beaten.
- D1 and D2 stay connected, hold a tight gap, and protect the blue line.
- All five players shift together to force the puck outside or behind the defense.
- A chip or dump is a successful result when it removes controlled entry speed.
- Turnovers trigger an immediate transition from defense to offense.
Coaching cues
- F1 + F2 = PRESSURE BOTH SIDES.
- F3 = MIDDLE.
- D = GAP UP.
- Puck on your side = GO.
- Puck away = HOLD.
- Force outside.
- Do not chase across.
- Protect the middle.
- Stay connected.
- Make them dump it.
- Turnover = GO.
Common mistakes
- The weak-side forward chases across the ice and abandons their lane.
- F3 drifts to the boards and leaves the middle open.
- The defense backs away and creates too much space behind the forwards.
- The defense steps up before the forwards establish pressure.
- The first layer gets beaten and recovers outside instead of through the middle.
- The five-player unit stretches into separate, disconnected layers.
Related content
Breakout: Slash
Breakout: Slash
A simple breakout that creates three clear options: the wall, low support, and a weak-side slash through the middle.
Defensive Zone: Hybrid Coverage
Defensive Zone: Hybrid Coverage
Three defenders cover low while two forwards protect high; when the puck moves above the circles, all five switch to man-to-man.
Defensive Zone: Swarm & Blitz Pressure
Defensive Zone: Swarm & Blitz Pressure
A coordinated pressure trigger that outnumbers a vulnerable puck carrier, wins possession, and quickly turns defense into offense.