
Overload Hockey
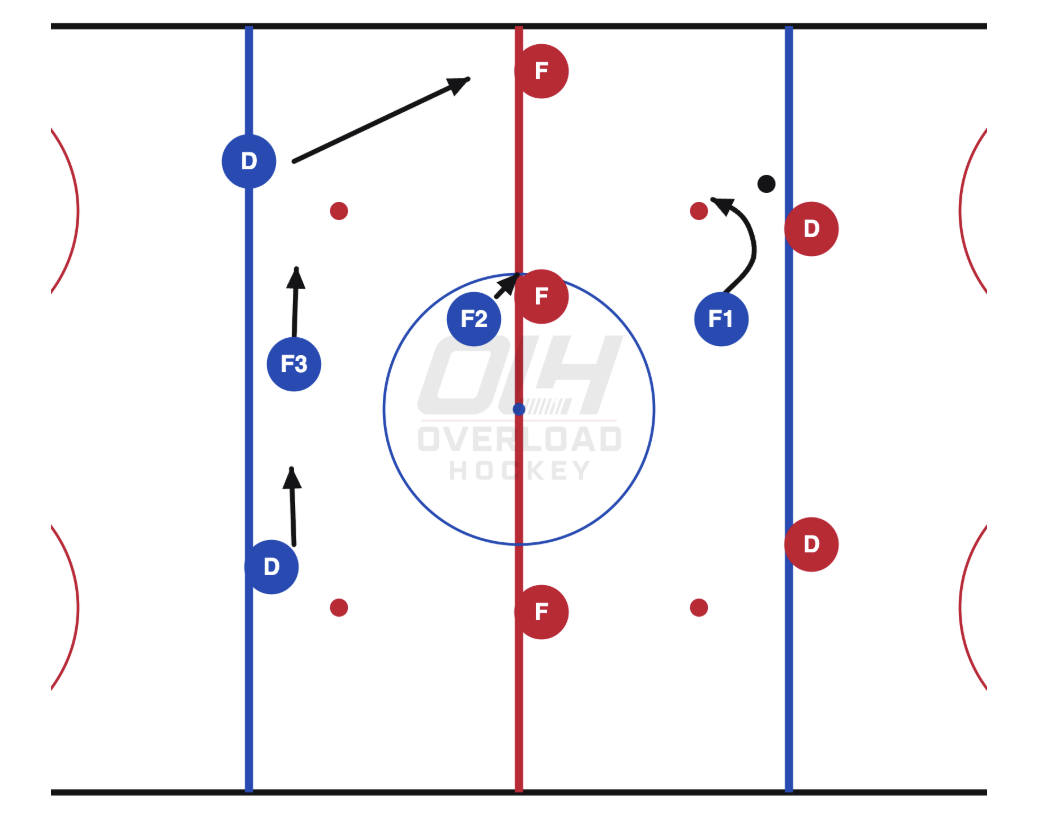
The 1-1-3 is our most conservative neutral-zone forecheck. It is designed to protect the middle of the ice, take away speed through the neutral zone, and force the opponent to dump the puck.
We are not trying to aggressively win the puck with our first forechecker. We are trying to make the opponent come through five layers of structure before they can enter our zone with possession.
The basic structure is:
F1 = Soft pressure F2 = Support / middle F3 + D1 + D2 = Three-man wall
F1 — Soft Pressure
F1 is our first forechecker. Do not chase.
Approach the puck carrier under control and use your angle to influence where the puck goes. Your job is to make the opponent choose a side and prevent an easy attack directly through the middle.
We don't need F1 to win the puck. We need F1 to make the breakout predictable.
F1 = steer the play.
F2 — Support
F2 plays underneath F1.
Stay in the middle of the ice and read where F1 sends the puck. Do not get pulled too far toward the puck.
Your job is to take away the next option and prevent the opponent from simply passing underneath F1 and attacking through the middle.
Think of F2 as the connection between F1 and our three-man wall.
F2 = middle support.
F3 + D1 + D2 — The Wall
Behind F1 and F2, we create a three-player wall across the ice.
F3 protects one side. D1 protects the middle. D2 protects the opposite side.
Stay connected. Do not create large gaps between the three players.
Our goal is to make the opponent look up and see no clean path through the neutral zone.
Nothing gets through the wall with speed.
When F1 Forces a Side
Once F1 identifies the puck carrier, angle them toward one side. Everyone behind F1 reads that pressure.
F2 shifts toward the puck while continuing to protect the middle. The three-man wall shifts together.
We are slowly taking away the opponent's available ice.
F1 steers. F2 supports. The wall closes.
Protect the Middle
The middle of the ice is our priority.
We do not want the opponent attacking our blue line through center ice with speed.
Keep sticks inside. Stay between the puck and our net. Make them move laterally or toward the boards.
When the Puck Goes Wide
Good. That's where we want it.
The outside player in the three-man wall can step toward the puck carrier. The middle player protects inside. The weak-side player stays connected and protects against a cross-ice play.
F2 supports from above the puck.
Now the puck carrier has pressure in front of them and very little space inside.
When They Pass Across the Ice
Shift together. Do not have individual players chasing the puck from side to side.
F1 and F2 adjust their angles. The three-man wall slides across the ice while maintaining its spacing.
The puck moves. The wall moves.
Stay connected and continue protecting the middle.
If They Try to Skate Through the Middle
F2 protects from above. The middle of our three-man wall steps up. The two outside players squeeze toward the middle.
We want to surround the puck carrier and eliminate their space. There should be no clean entry through the center of our structure.
Force the Dump
This is the result we're looking for.
We want the opponent to reach the red line, look up, and realize they have nowhere to go with possession.
If they dump the puck behind us, that's a win.
Our defense can retrieve. Our forwards recover. We immediately transition into our breakout.
We would rather retrieve a puck with five players organized than defend an opponent entering our zone with possession and speed.
Do Not Chase
Patience is what makes the 1-1-3 work.
F1 does not chase behind the puck. F2 does not jump outside looking for a hit. F3 does not abandon the wall trying to create pressure.
Stay in structure. Make the opponent come through us. We don't need the puck immediately.
Stay Connected
The 1-1-3 becomes vulnerable when the layers separate.
If F1 and F2 get too aggressive, the opponent can attack the space behind them. If the three-man wall backs away too quickly, we give up the neutral zone.
Move together. Maintain good spacing. Give the opponent less and less ice as they approach our blue line.
When We Create a Turnover
Transition quickly.
The closest player attacks the loose puck. The other players immediately become support options.
Do not stay in the 1-1-3 once we've established possession. The structure has done its job.
Turnover = transition.
When to Use the 1-1-3
The 1-1-3 is especially useful when we want to control the game rather than trade chances.
We can use it when protecting a lead, facing an opponent that is dangerous off the rush, slowing the game down, defending a team that stretches the neutral zone, or forcing dump-ins instead of controlled entries.
The mentality changes from go get the puck to make them come through us.
Coaching Cues
F1 makes the opponent choose a side. F2 takes away the next option. F3 and the two defensemen create a three-man wall behind them.
Be patient, protect the middle, and make them give us the puck.
The identity of our 1-1-3 is simple: STEER. SUPPORT. WALL.
What to look for
- F1 applies controlled pressure and steers the puck carrier without chasing.
- F2 stays underneath F1, protects the middle, and removes the next option.
- F3, D1, and D2 form a connected three-player wall across the ice.
- The whole structure shifts together as the puck moves from side to side.
- A forced dump-in is a win because all five players are organized to retrieve.
- Once possession is established, transition immediately out of the 1-1-3.
Coaching cues
- F1 = STEER.
- F2 = SUPPORT.
- F3 + D + D = WALL.
- Protect the middle.
- Sticks inside.
- Outside is okay.
- Don't chase.
- Wall moves together.
- No clean entries.
- Dump-in = win.
- Turnover = transition.
Common mistakes
- F1 chases the puck instead of steering the carrier toward one side.
- F2 gets pulled too far outside and opens the middle underneath F1.
- The three-player wall develops large gaps between its players.
- Individual players chase cross-ice passes instead of shifting together.
- The wall backs away too quickly and gives up the neutral zone.
- An outside player abandons the wall before support is in place.
- Players remain in the 1-1-3 after winning possession instead of transitioning.
Related content
Breakout: Slash
Breakout: Slash
A simple breakout that creates three clear options: the wall, low support, and a weak-side slash through the middle.
Defensive Zone: Hybrid Coverage
Defensive Zone: Hybrid Coverage
Three defenders cover low while two forwards protect high; when the puck moves above the circles, all five switch to man-to-man.
Defensive Zone: Swarm & Blitz Pressure
Defensive Zone: Swarm & Blitz Pressure
A coordinated pressure trigger that outnumbers a vulnerable puck carrier, wins possession, and quickly turns defense into offense.